Key Takeaways
- The VICIdial Apache Port 80 Error occurs when another service, most commonly Nginx, an existing Apache instance, or a monitoring agent, has already bound to port 80 before Apache starts.
- Running lsof -i:80 or ss -tlnp | grep :80 instantly reveals which process is the culprit.
- Stopping or reconfiguring the conflicting service, then restarting Apache, resolves the issue in most cases without touching VICIdial’s core configuration.
- Multi-server VICIdial deployments and environments using active VICIdial API integration are especially vulnerable because additional services are often co-installed.
- Preventive measures, firewall rules, startup service ordering, and port-reservation documentation, eliminate recurring conflicts.
The VICIdial Apache Port 80 Error stops Apache from starting because the TCP port it needs, port 80, is already claimed by another running process. VICIdial’s entire web-based interface, its administrative panel, and the endpoints relied upon by its API layer all depend on Apache (httpd) binding successfully to port 80 at startup.
When that binding fails, operators lose access to agent screens, supervisors cannot reach the management interface, and any external system using a VICIdial external API connection gets a refused connection instead of a response.
This error surfaces most often during server reboots, OS upgrades, or when a second service is installed on the same machine without checking existing port assignments. The symptom is deceptively simple, Apache refuses to start, but the root cause requires a targeted diagnostic process to identify correctly.
Why Port 80 Matters to VICIdial’s Web Interface and API Layer
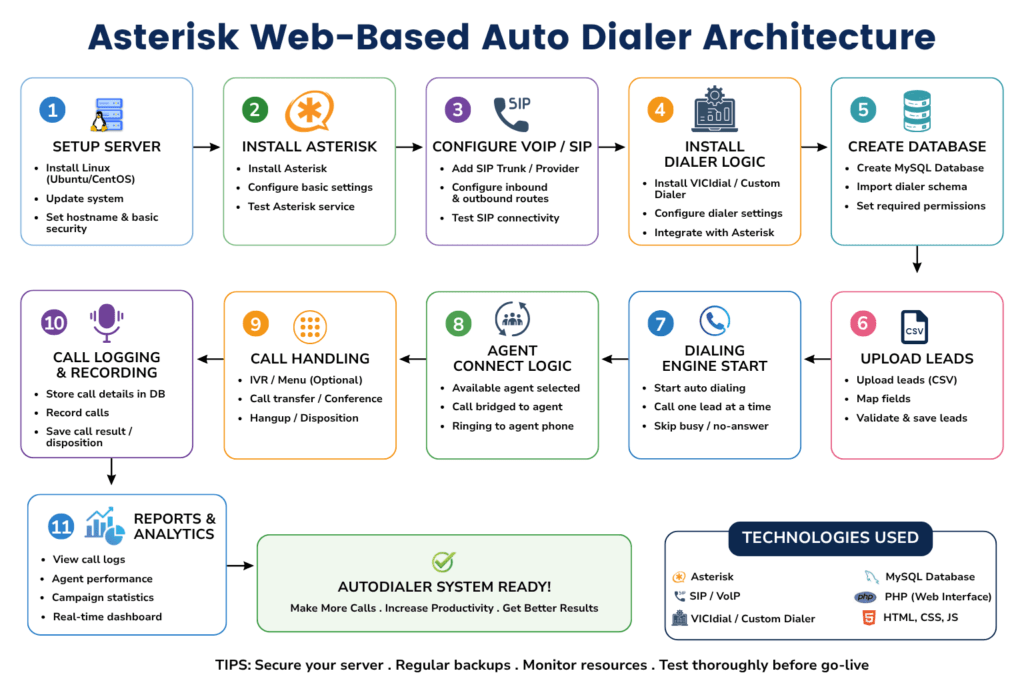
VICIdial runs on a LAMP stack. Apache is not just a convenience for the web interface; it is the transport layer for every browser-based and programmatic interaction with the system.
The Web Interface Dependency
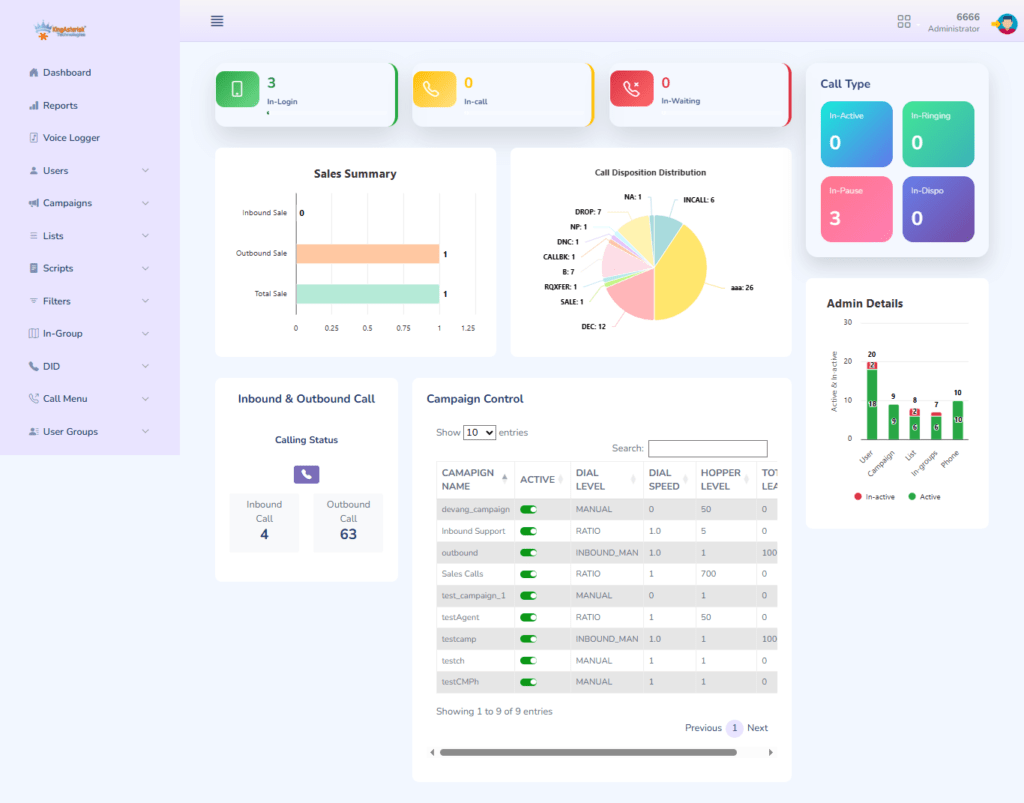
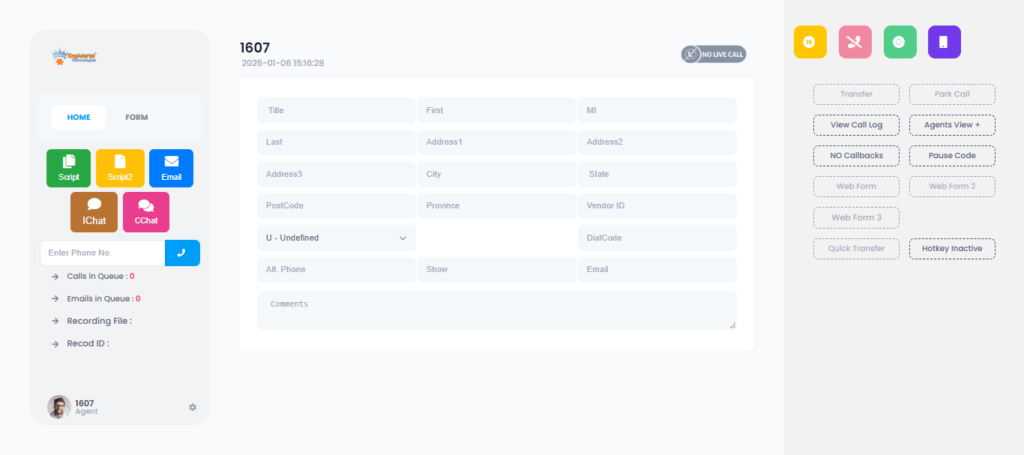
Agent login pages, inbound and outbound campaign dashboards, real-time reporting, and supervisor monitoring screens are all served through Apache on port 80. When Apache is down, none of these functions are reachable, the contact center effectively goes dark from a management perspective.
The API Layer Dependency
VICIdial exposes two primary programmatic interfaces, both routed through Apache:
The standard VICIdial API accessed via HTTP requests to http://[server]/vicidial/non_agent_api.php, handles inbound lead injection, campaign control, agent status queries, and disposition updates.
Non-agent VICIdial API used by third-party CRMs, ticketing platforms, and workforce management tools that need to push or pull data without an active agent session.
Any VICIdial REST API integration or VICIdial automation API workflow built by your team will fail silently or throw connection errors the moment port 80 is unavailable. This is why fixing a port conflict is not merely a server administration task, it is a business continuity issue.
Common Services That Steal Port 80
Understanding which processes commonly conflict with Apache on VICIdial servers narrows your diagnostic time considerably.
Nginx
Nginx is the most frequent offender. Developers sometimes install Nginx as a reverse proxy or static file server on the same machine, not realising Apache is already configured to own port 80. Both services start on boot, and whichever launches first wins the port.
A Second Apache Instance
On servers that have been rebuilt, cloned, or upgraded without a clean state, it is possible to have two separate Apache installations, for example, the system-packaged apache2 alongside a manually compiled httpd, both configured for port 80.
Monitoring and Metrics Agents
Some infrastructure monitoring agents (Prometheus exporters, proprietary APM tools) and certain database management panels bind to port 80 as their default listener. These are easy to miss during initial setup.
Asterisk HTTP Interface
Because VICIdial is tightly coupled with Asterisk, some engineers enable the Asterisk built-in HTTP server (used for AMI over HTTP or ARI endpoints) without realising it can be configured to use port 80 by default.
Panel Software Residuals
cPanel, Webmin, or ISPConfig remnants from a previous server role sometimes leave services bound to port 80 even after the primary panel software has been removed.
Step-by-Step Diagnosis: Finding the Conflicting Process
Before touching any configuration, identify exactly what is using port 80. Guessing wastes time and risks disrupting unrelated services.

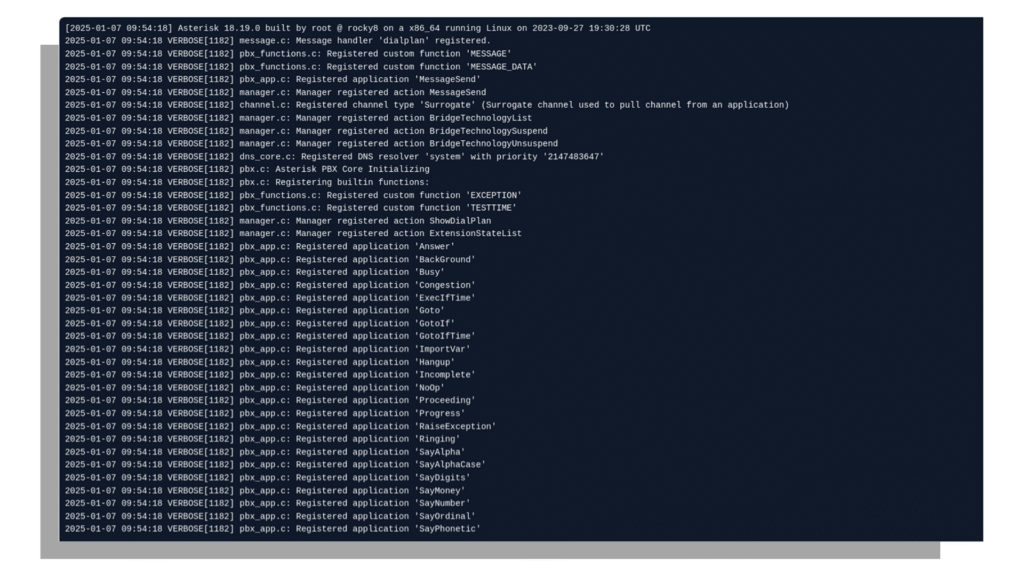
Step 1 — Check the Apache Error Log First
tail -n 50 /var/log/httpd/error_log
# or on Debian/Ubuntu-based systems:
tail -n 50 /var/log/apache2/error.log
Look for a line resembling:
(98)Address already in use: AH00072: make_sock: could not bind to address 0.0.0.0:80This confirms port 80 is occupied. Now find out by whom.
Step 2 — Identify the Process Occupying Port 80
lsof -i:80This lists every process with an open file descriptor on port 80. The output columns you care about are COMMAND (process name), PID (process ID), and USER (which account owns it).
If lsof is not installed:
ss -tlnp | grep :80Or using netstat (on older systems):
netstat -tlnp | grep :80Sample output you might see:
COMMAND   PID     USER   FD   TYPE  DEVICE SIZE/OFF NODE NAME
nginx     14832   root   6u   IPv4  98431     0t0   TCP *:http (LISTEN)
This tells you immediately that Nginx is the conflict.
Step 3 — Confirm the Process Details
Once you have the PID, confirm what you are dealing with:
ps aux | grep 14832And check whether the service is managed by systemd:
systemctl status nginx
# or
systemctl status apache2
Complete Fix Guide: Stopping the Conflict and Restoring Apache
With the conflicting process identified, you have three resolution paths depending on whether the competing service is needed.
Resolution Path A — Stop the Conflicting Service (It Is Not Needed)
If the service occupying port 80 has no ongoing purpose on this server:
# Stop the service immediately
systemctl stop nginx# Prevent it from starting again on reboot
systemctl disable nginx# Verify port 80 is now free
lsof -i:80# Start Apache
systemctl start httpd# or on Debian/Ubuntu:
systemctl start apache2# Confirm Apache is running
systemctl status httpdResolution Path B — Move the Conflicting Service to a Different Port (Both Services Needed)
If Nginx (or another service) is genuinely required on the same host, redirect it to a non-conflicting port.
For Nginx, edit /etc/nginx/sites-enabled/default or the relevant server block:
server {
    listen 8080;   # Changed from 80
    server_name _;
    ...
}

Then restart Nginx and start Apache:
systemctl restart nginx
systemctl start httpd
Important: If you moved a service that was fronting a VICIdial API integration endpoint, update all client-side URLs and API base paths to reference the new port.
Resolution Path C — Move Apache to a Different Port
If the service on port 80 cannot be moved (for example, it is an external dependency you do not control), you can reconfigure Apache.
Edit /etc/httpd/conf/httpd.conf:
# Change this line:
Listen 80
# To:
Listen 8080

Also update any VirtualHost blocks referencing port 80:
<VirtualHost *:8080>
Then restart Apache and update VICIdial’s configuration to reflect the new port. Note that this approach requires updating all VICIdial API integration call strings, any non-agent API scripts, and any firewall rules that filter port 80 traffic.
Final Verification
After restarting Apache, run a full service check:
# Confirm Apache is bound to port 80
ss -tlnp | grep :80# Test the VICIdial web interface
curl -I http://localhost/vicidial/admin.php# Check Apache logs for clean startup
tail -n 20 /var/log/httpd/error_logA HTTP/1.1 200 OK or 302 Found response from the curl command confirms VICIdial’s web layer is operational.
Real-World Use Case: Nginx and VICIdial REST API Integration on the Same Host
A mid-sized outbound collections operation running roughly 120 concurrent agents was using VICIdial as their dialler platform. Their development team had built a custom lead injection pipeline using the VICIdial REST API integration endpoint (non_agent_api.php) to push fresh leads from their CRM every 15 minutes throughout the business day.
During a routine OS patch cycle, the server administrator installed Nginx to serve static documentation assets for an internal wiki. Neither the administrator nor the development team communicated about this change. Nginx was configured with its default settings, which bound it to port 80.
On the next server reboot following the patch, Nginx started first (its systemd unit had a lower After= priority than intended), claimed port 80, and Apache failed to start. The VICIdial web interface became unreachable, agent logins failed, and the CRM’s lead injection pipeline began throwing connection refused errors, silently queuing up failures that took over an hour to notice because no alerting was configured on the API integration endpoint.
The resolution took under ten minutes once the root cause was identified:
- lsof -i:80 immediately revealed Nginx as the port holder.
- Nginx was reconfigured to listen on port 8081 (the documentation wiki was internal-only and had no external routing requirements).
- Apache was started and bound port 80 cleanly.
- The lead injection pipeline resumed without any data loss because the CRM had queued the failed requests locally.
The lasting lesson: In any environment running a VICIdial external API connection that feeds business-critical data, port conflicts translate directly into dropped leads and degraded operations. Monitoring Apache’s availability, not just the server’s uptime, is a necessary operational control.
Preventing the Error from Coming Back
Fixing the conflict once is straightforward. Keeping it fixed requires a small set of deliberate practices.
Document Port Assignments
Maintain a simple port registry for the server. A text file or internal wiki page listing which service owns which port takes five minutes to create and prevents hours of troubleshooting during future maintenance windows.
Use systemd Service Ordering
Ensure Apache’s systemd unit file has explicit ordering that accounts for other services. In
/etc/systemd/system/httpd.service.d/override.conf:
[Unit]
After=network.target
Before=nginx.service
This reduces, but does not eliminate, the chance of a race condition during boot.
Configure Port-Conflict Alerts
Use a simple monitoring check (Nagios, Zabbix, or even a cron-driven curl script) that tests http://localhost/vicidial/admin.php every five minutes and alerts on any non-2xx/3xx response. For environments relying on VICIdial API workflows, extend this check to include a lightweight API health probe.
Firewall Rule Auditing
Periodically audit iptables or firewalld rules to ensure port 80 is explicitly associated with Apache and that no new service has opened the port through a different chain.
Pre-Installation Checks
Before installing any new service on a VICIdial server, run ss -tlnp and review the output. Make it a mandatory step in your server change management checklist.
Frequently Asked Questions
Check the Apache service status with systemctl status httpd (or apache2). If the status shows “failed” or “inactive,” and the error log contains “Address already in use” for port 80, the web interface is down due to a port conflict. Run lsof -i:80 to confirm which process is responsible before attempting any fix.
Yes, but every client calling the API must be updated to use the new port. The non-agent VICIdial API and all REST API integration endpoints are served by Apache, so if you move Apache to port 8080, every API call URL must be updated from http://server/vicidial/non_agent_api.php to http://server:8080/vicidial/non_agent_api.php. Firewall rules must also be adjusted accordingly.
It is faster to stop the service cleanly via systemctl stop [service-name] rather than killing by PID. Killing a PID directly bypasses the service manager’s shutdown hooks, may leave lock files behind, and does not prevent the service from restarting on the next boot. Use systemctl stop followed by systemctl disable if the service should not run on this host.
During normal operation, Apache is already running and holds the port, so no conflict occurs. On reboot, all services start simultaneously. Whichever service reaches its bind call first claims the port. If systemd service dependencies are not explicitly configured, the startup order is non-deterministic and Nginx or another HTTP service may occasionally beat Apache to port 80.
No. Asterisk’s telephony stack (SIP, DAHDI, AMI over TCP) is independent of Apache. Active calls, IVR call flows, and the Asterisk Manager Interface operate on separate ports. However, VICIdial’s agent web interface, real-time reporting, and any VICIdial external API connection dependent on HTTP will be unavailable until Apache is restored. Agents already logged in may continue working temporarily until their session expires.
Conclusion
The VICIdial Apache Port 80 Error is one of the more disruptive server-layer issues a contact center can encounter precisely because its impact is immediate and broad, taking down the web interface, blocking agent access, and severing any active VICIdial API integration in a single failure. The good news is that the diagnosis path is short and the resolution options are straightforward once you know which service is the offender.
The key steps bear repeating: use lsof -i:80 to identify the conflicting process, decide whether to stop it, relocate it to another port, or migrate Apache itself, then verify the fix with a clean Apache startup and a live curl probe against the VICIdial interface. Beyond the immediate fix, invest ten minutes in the preventive measures, port documentation, systemd ordering, and a lightweight availability check, to ensure the issue does not resurface after the next scheduled maintenance window.
If you are experiencing persistent Apache or webserver issues on your VICIdial deployment, or if you need expert guidance on configuring a stable VICIdial REST API integration for your contact center environment, the engineering team at KingAsterisk is ready to help. Contact us to discuss your setup and get hands-on support from specialists with deep deployment experience.
Written by the KingAsterisk Engineering Team, specialists in VICIdial deployment, Asterisk configuration, and contact center infrastructure with over a decade of hands-on implementation experience across global operations.