Key Takeaways
- A production-ready Asterisk auto dialer can be built and deployed in under 10 days using a Python/Django backend, Asterisk AMI, and a React agent interface.
- The AMI (Asterisk Manager Interface) is the critical bridge between your web application and call-processing engine, get this right and everything else follows.
- Real-time call status, contact list import, and agent dashboards require WebSocket integration alongside standard HTTP API routes.
- Call recording, predictive pacing, and disposition logging can all be layered on top of the core architecture without rebuilding from scratch.
- Proper trunk and dialplan configuration is where most first-time Asterisk dialer builds fail, this guide covers both in detail.
Asterisk auto dialer setup is one of the most requested, and most underestimated, engineering projects in the contact center space. When a client approached KingAsterisk needing a fully functional web-based outbound Asterisk dialer integrated with their SIP provider, with a clean agent interface and deployment documentation their in-house team could maintain, we had a clear brief and a tight timeline.
This guide documents exactly what we built, how we built it, and the architectural decisions you need to get right the first time.
Whether you are an IT manager evaluating options, a developer inheriting a dialer project, or a contact center operator who wants to understand what is actually going on under the hood, this is the complete walkthrough.
Why Asterisk for Outbound Dialing
Not every dialer project calls for a third-party SaaS platform. When your team needs ownership, customisation, and long-term control over telephony infrastructure, Asterisk remains the most proven open-source option available.
Asterisk is a software-based telephony framework maintained by Sangoma. It has been in production environments since 1999 and underpins a significant portion of the world’s contact center infrastructure, including VICIdial, one of the most widely deployed open-source dialers on the planet. The reasons contact centers continue to build on it are straightforward:
- Full source access: No licensing fees, no vendor lock-in, no arbitrary API call limits.
- Mature SIP stack: Asterisk handles SIP trunking, codec negotiation, and call routing with stability accumulated over two decades of production use.
- AMI integration: The Asterisk Manager Interface gives your web application a programmatic socket-based bridge to originate calls, monitor channels, and receive real-time events.
- Community and ecosystem: Modules, documentation, and practitioner knowledge are broadly available.
- Interoperability: Works with any standards-compliant SIP provider, meaning your dialer is not dependent on a single carrier relationship.
Deployment note: This guide focuses on a self-hosted Asterisk installation (Ubuntu 22.04 LTS recommended). All configuration examples assume Asterisk 20.x with chan_pjsip as the primary channel driver.
System Architecture Overview
A web-based auto dialer has three distinct layers that must work in coordination:
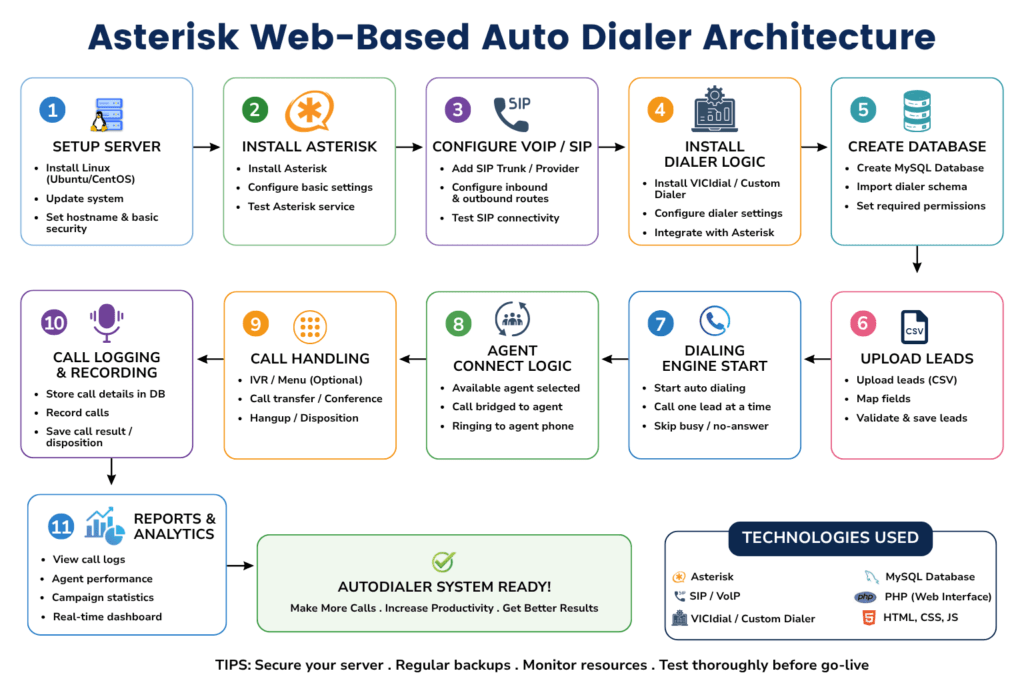
1. Telephony Layer (Asterisk)
Handles all call signalling, media, recording, and trunk management. Asterisk sits at the center of the telephony layer, communicating with your SIP provider over configured trunks and with your application layer over AMI.
2. Application Layer (Backend API)
Manages campaign logic, contact list queuing, agent session state, call disposition recording, and orchestrates origination requests to Asterisk via AMI. This is the brain of the dialer, it decides which contact to call next, which agent to assign it to, and what to do with the result.
3. Presentation Layer (Agent Interface)
A browser-based interface where agents log in, see their assigned calls, record outcomes, and handle real-time status updates delivered via WebSocket. No softphone installation required, agents work entirely in the browser using WebRTC or a connected desk phone.
AMI is your integration backbone. All three layers communicate through two channels: AMI sockets (Asterisk ↔ Backend) and a REST/WebSocket API (Backend ↔ Frontend). Design these interfaces cleanly and your dialer will scale.
Step-by-Step Build Process for Asterisk Auto Dialer Setup
The following sequence reflects the actual build order we followed for the client project referenced in this guide. Each step builds on the previous one, do not skip ahead.
Provision and Harden the Server
Start with a fresh Ubuntu 22.04 LTS instance. Apply OS updates, configure a firewall (UFW or iptables), lock down SSH to key-based auth, and set up fail2ban. Asterisk servers are attractive targets for toll fraud, security is not optional, it is foundational.
Install and Compile Asterisk
Download the Asterisk 20.x source from downloads.asterisk.org. Run./configure, then make menuselect to enable required modules including res_pjsip, app_dial, app_queue, res_agi, and func_odbc for database integration. Compile with make && make install.
Configure PJSIP Trunks and Extensions
Create your PJSIP trunk configuration in pjsip.conf pointing to your SIP provider. Define internal endpoints for each agent (or use a single shared endpoint for progressive dialing). This is the most provider-specific part of the setup, your SIP carrier will supply the credentials and registration details.
Build the Dialplan in extensions.conf
Write the outbound dialplan context that handles call origination, answer detection, recording initiation, and hangup handling. Include an AGI script hook so your Python backend can inject dynamic behaviour (such as playing a recorded message before bridging to an agent).
Enable and Configure AMI
In manager.conf, enable AMI on 127.0.0.1 port 5038. Create a dedicated AMI user for your application with the minimum permissions required: system, call, log, originate. Never expose AMI directly to the internet.
Build the Django Backend with AMI Client
Implement a persistent AMI socket connection using Python’s asyncio. Build models for Campaign, Contact, Agent, CallRecord, and Disposition. Create the API endpoints for contact import (CSV/Excel), campaign control, and agent session management.
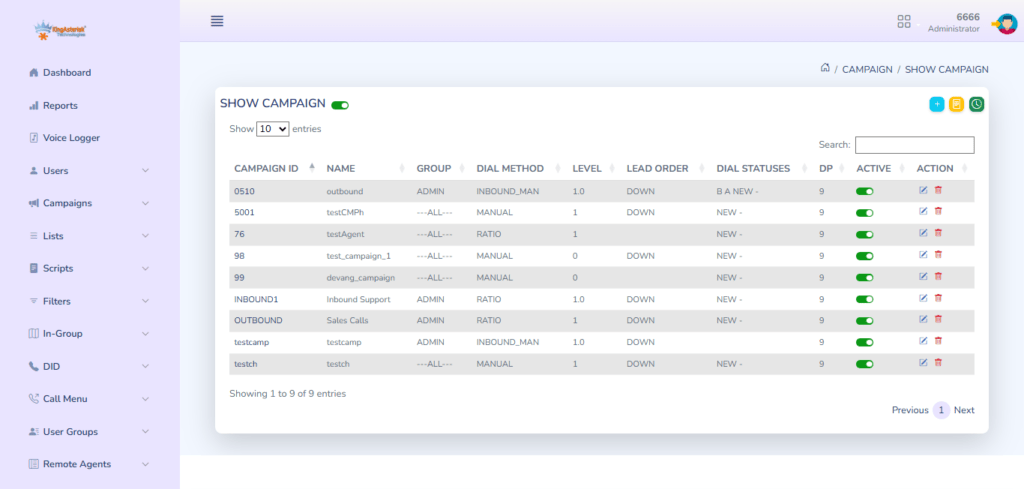
Implement the Campaign Dialing Engine
Write the Celery task that processes the contact queue, checks agent availability, and fires AMI Originate actions. Implement the dialing ratio logic, start with progressive (1:1) before building predictive pacing. Handle NoAnswer, Busy, and Congestion results with appropriate retry scheduling.
Build WebSocket Event Push
Use Django Channels with a Redis channel layer to push AMI events to connected agent browsers in real time. Events to forward: Dial, Bridge, Hangup, and channel variable updates. This is what makes the agent interface feel live rather than requiring manual refresh.
Build the React Agent Interface
Create the agent dashboard showing current call state, contact information, call history, and disposition form. Connect to the WebSocket endpoint. Implement campaign supervisor view with live stats: calls in progress, available agents, contacts remaining, and answer rate.
Configure Nginx, SSL, and Process Management
Set up Nginx as a reverse proxy for Django (via Gunicorn) and React. Configure SSL/TLS. Use systemd unit files or Supervisor to manage Asterisk, Django, Celery, and Redis as persistent services with automatic restart on failure.
Asterisk Dialplan and Trunk Configuration
Most first-time dialer builds fail not in the application code, but in the dialplan. Always store SIP credentials in environment variables or a secrets manager, never hardcoded in configuration files committed to version control.
Agent Web Interface Design
The agent interface needs to deliver three things without friction: clarity on the current call, fast disposition recording, and zero dependency on external software.
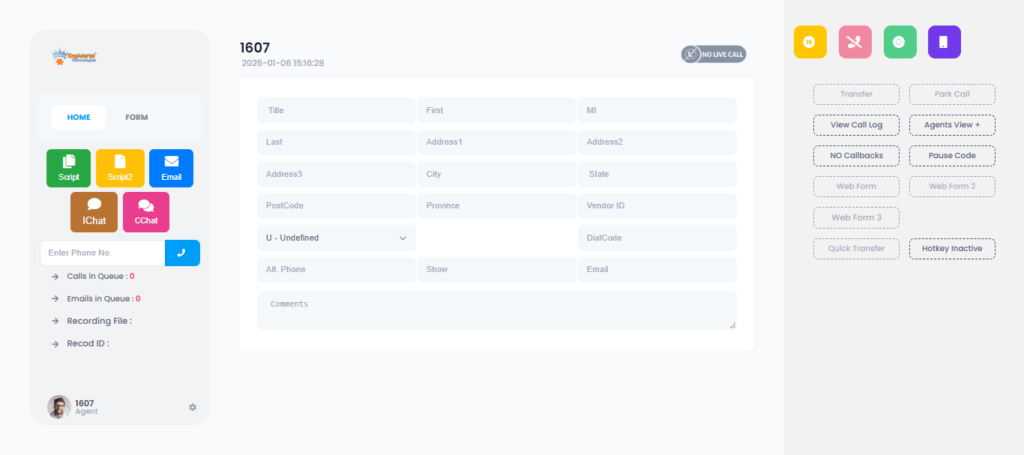
Agent Dashboard Components
- Call status panel: Shows current call state (ringing, connected, hold), contact name, phone number, and duration timer in real time via WebSocket.
- Contact info sidebar: Pulls contact record from the backend API when a call connects — name, prior call history, campaign notes.
- Disposition form: A minimal form (dropdown + optional text note) that agents complete before moving to the next call. Dispositions write back to the database and can trigger follow-up tasks via Celery.
- Queue indicator: Shows the agent their position in the active campaign, calls remaining, and their personal stats for the session.
- Supervisor overlay: A separate login tier for supervisors to see all agents’ live status, barge into calls, and adjust campaign pacing in real time.
Real-World Use Case: Insurance Outbound Campaign
A regional insurance broker contacted KingAsterisk needing to replace a manual dialing workflow with an automated system. Their team of 12 agents was manually dialling from spreadsheets. Target: policy renewal reminders to approximately 8,000 contacts over a 3-week campaign window.
Stack deployed: Asterisk 20 on Ubuntu 22.04, Django backend, React agent interface, PostgreSQL, SIP trunk via their existing carrier.
Timeline: Architecture confirmed Day 1. Asterisk and backend running Day 4. Agent interface integrated Day 7. UAT and documentation Day 8–9. Live Day 10.
- Results after first campaign run: 3.8×
- Increase in contacts reached per agent-hour: 100%
- Calls recorded and retrievable: 0
- Third-party software dependencies for agents: 10 days
Full build to live deployment
The client’s in-house IT team took over maintenance after a half-day handover session using the deployment documentation we provided. Six months later, they extended the system with an inbound IVR for the same SIP infrastructure, which Asterisk handles natively.
Advanced Features You Can Layer In
The architecture described above is intentionally modular. Once your core dialer is stable, the following additions require no structural rebuild:
Call Recording and Retrieval
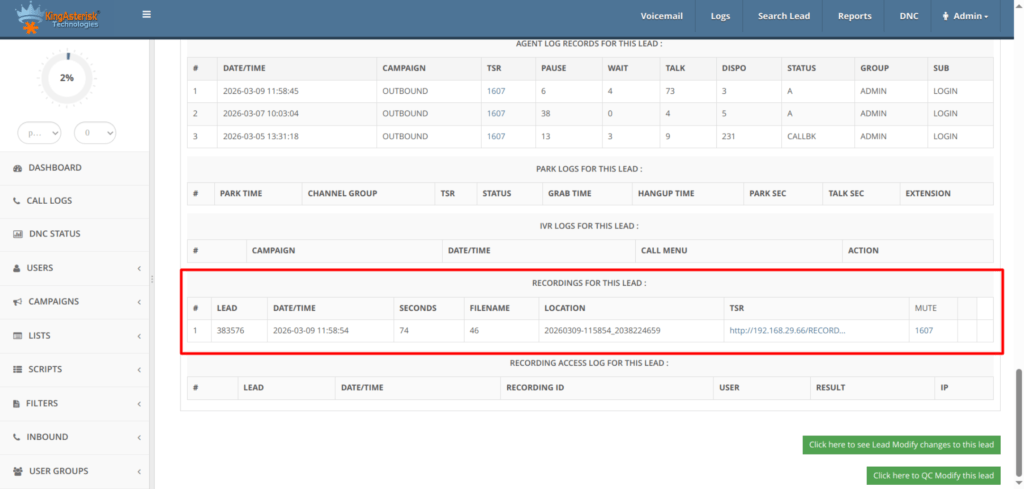
MixMonitor records both legs of every call to a configurable path. Your backend indexes recordings against call records in PostgreSQL. A simple React audio player with permissions-controlled access gives supervisors playback directly in the browser. Store recordings on a separate volume and set a retention policy from day one.
Automated Message Delivery (AMD + Pre-recorded Drop)
Asterisk’s built-in AMD (Answer Machine Detection) application can detect whether a human or voicemail has answered. On machine detection, your dialplan can play a pre-recorded message using Playback() and log the outcome. This is useful for notification campaigns that do not require live agent interaction.
Predictive Dialing
Progressive dialing (one call per available agent) is the safe starting point. Predictive dialing uses a statistical model to dial ahead of agent availability, abandoning calls when no agent is free. This requires careful abandonment rate monitoring to stay compliant with local telecommunications regulations, implement it only after your progressive dialer is stable and you have sufficient call volume data.
Campaign Analytics Dashboard
Aggregate your PostgreSQL call records with a charting library on the supervisor interface to show hourly answer rates, disposition breakdowns, agent performance comparison, and campaign completion projections. This data is already in your database, it just needs to be surfaced.
DNC (Do Not Call) List Integration
Before any contact is added to the outbound queue, run a check against your DNC table. This is a database lookup in your Celery task before the AMI Originate action fires. Non-negotiable for any commercial deployment.
Frequently Asked Questions
What is the difference between a progressive and a predictive dialer in Asterisk❓
A progressive dialer places exactly one outbound call per available agent, no call originates until an agent is confirmed free. A predictive dialer dials multiple contacts simultaneously, using statistical models to predict agent availability. Progressive dialing has a zero abandonment rate; predictive dialing increases contact rates but requires careful pacing to avoid excessive abandoned calls.
Do agents need to install a softphone to use an Asterisk-based web dialer❓
Not necessarily. There are two common approaches: WebRTC, where audio runs entirely in the browser with no installation required, or a “click-to-call” model where Asterisk bridges the agent’s desk phone and the outbound call. WebRTC is simpler for agents; desk phone bridging is often preferred in environments with existing phone hardware or strict audio quality requirements.
Can Asterisk integrate with any SIP provider, or is it limited to specific carriers❓
Asterisk works with any SIP-compliant provider. Configuration is done in pjsip.conf using the credentials your carrier provides. The main variables are registration host, username, password, and codec preferences. Most SIP providers publish Asterisk-specific setup guides. We have deployed successfully with over a dozen different carriers across international markets.
How does Asterisk handle call recording storage and retrieval❓
Asterisk’s MixMonitor application writes mixed-channel recordings to a configurable local directory in WAV or MP3 format. Your backend application indexes these files against call records in the database. Retrieval is then a standard file-serve operation via your web application. For long-term storage, recordings can be moved to object storage using a scheduled background task.
Conclusion
A well-built Asterisk auto dialer setup is not just a technical project, it is a contact center productivity asset that compounds value with every campaign it runs. The architecture described in this guide, Asterisk for telephony, Django for application logic, React for the agent interface, and AMI as the integration bridge, has been validated across real-world deployments and is maintainable by a capable in-house engineering team.
The key decisions that determine success are made early: server hardening, dialplan design, AMI permission scoping, and WebSocket architecture. Get these right and the rest of the build is systematic. Shortcut them and you will spend double the time fixing instability in production.
KingAsterisk has been building on Asterisk for over 15 years, from single-site installations to multi-tenant contact center platforms handling millions of calls per month. If you are planning an outbound dialer build and want to discuss architecture, timeline, or technical requirements, our engineering team is ready to help.
Ready to Build Your Asterisk Dialer?
Talk to a KingAsterisk engineer about your outbound dialer requirements. We’ll walk you through architecture. Contact Us About Your Dialer Project